> ## Documentation Index
> Fetch the complete documentation index at: https://editor.pascal.app/docs/llms.txt
> Use this file to discover all available pages before exploring further.
# Walls
> Draw straight or curved walls with two clicks, guided by live measurements and snapping, then reshape, move, or delete them.
Walls are the backbone of every Pascal building. You draw them segment by segment,
and they host the [doors and windows](/building/doors-and-windows) that cut through
them. Close a loop of walls and Pascal creates the room's
[floor and ceiling](/building/floors-and-levels) for you.
## Draw a wall
Open the **Build** tab and pick **Wall** (or press `B` to jump straight into build
mode with the wall tool armed). Then:
1. Click once to set the wall's start point.
2. Click again to place the end — the wall is created.
3. The next segment starts from the endpoint you just placed, so you can keep
clicking to chain walls around a room.
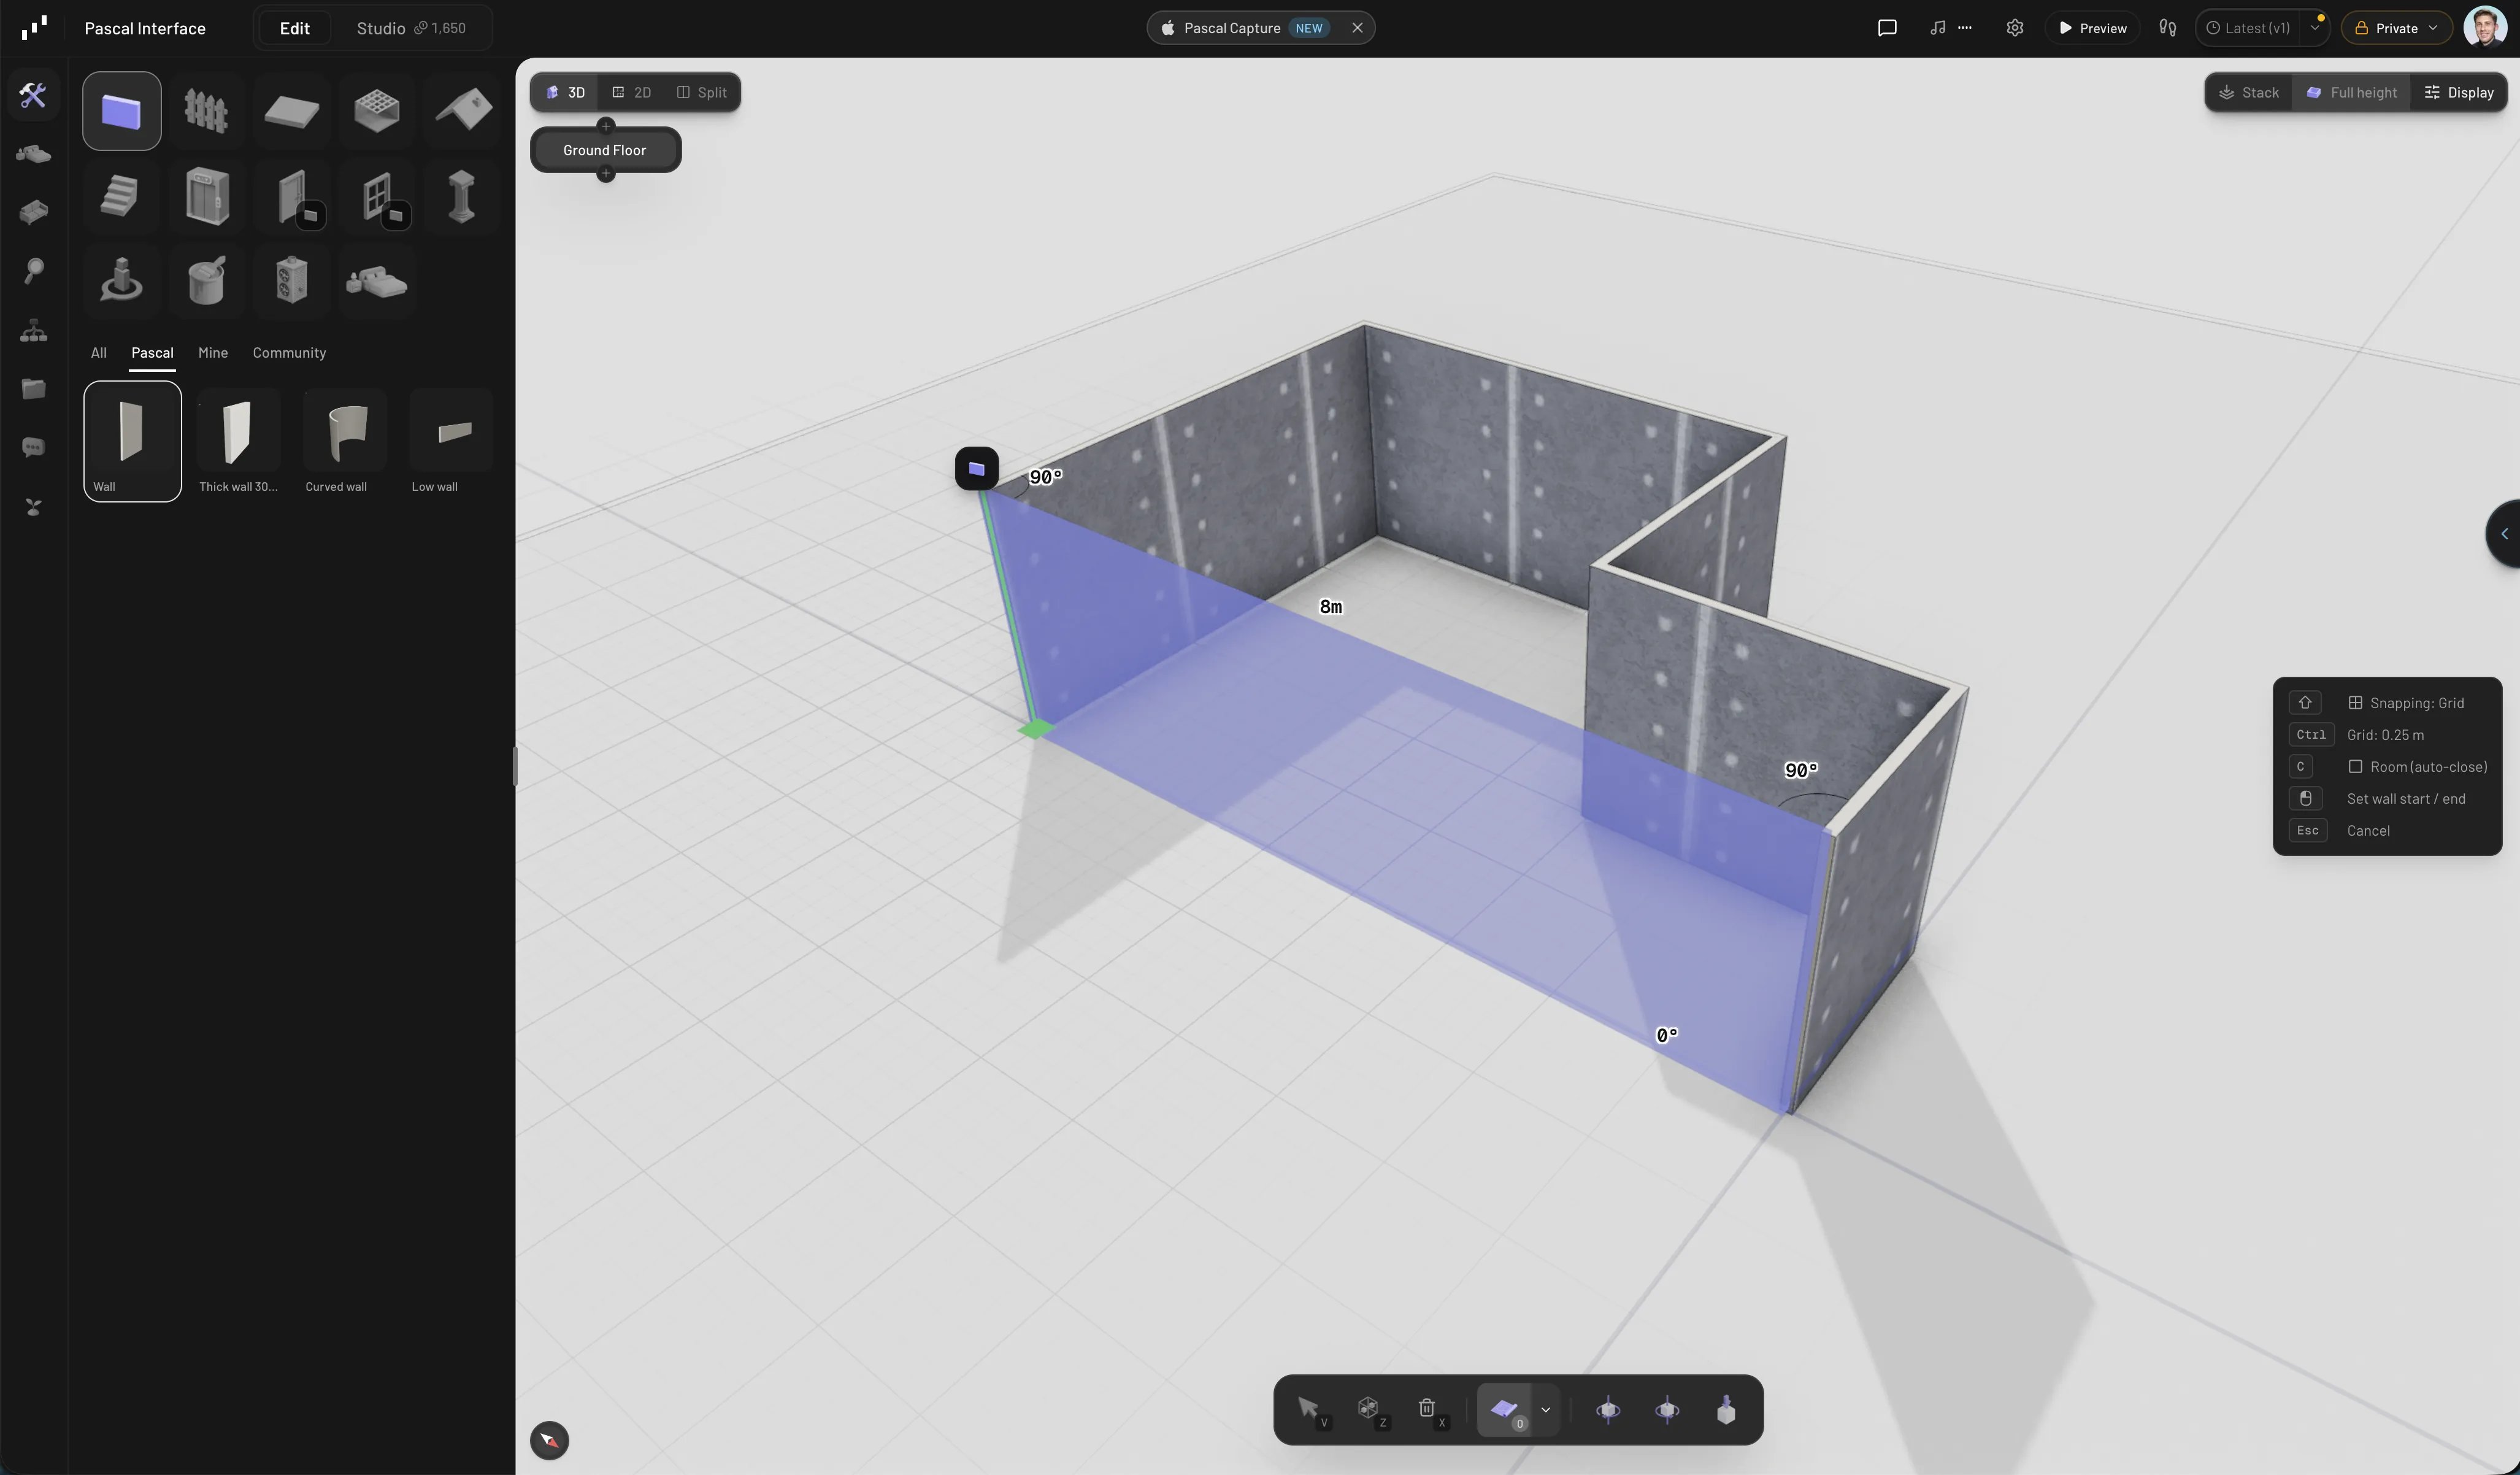
The helper panel on the right shows a continuation chip — press `C` (or click it)
to switch between the two drawing styles:
* **Room (auto-close)** — the default. Segments keep chaining, and the draft
finishes automatically when you loop back to your starting corner or seal a
room against existing walls.
* **Single wall** — one segment per gesture; drawing stops after the second click.
Double-click to end a chain early, and press `Esc` to cancel the segment you're
drawing. Wall drawing works the same way in the 3D view and the 2D floor plan —
use whichever you prefer.
## Lengths and angles
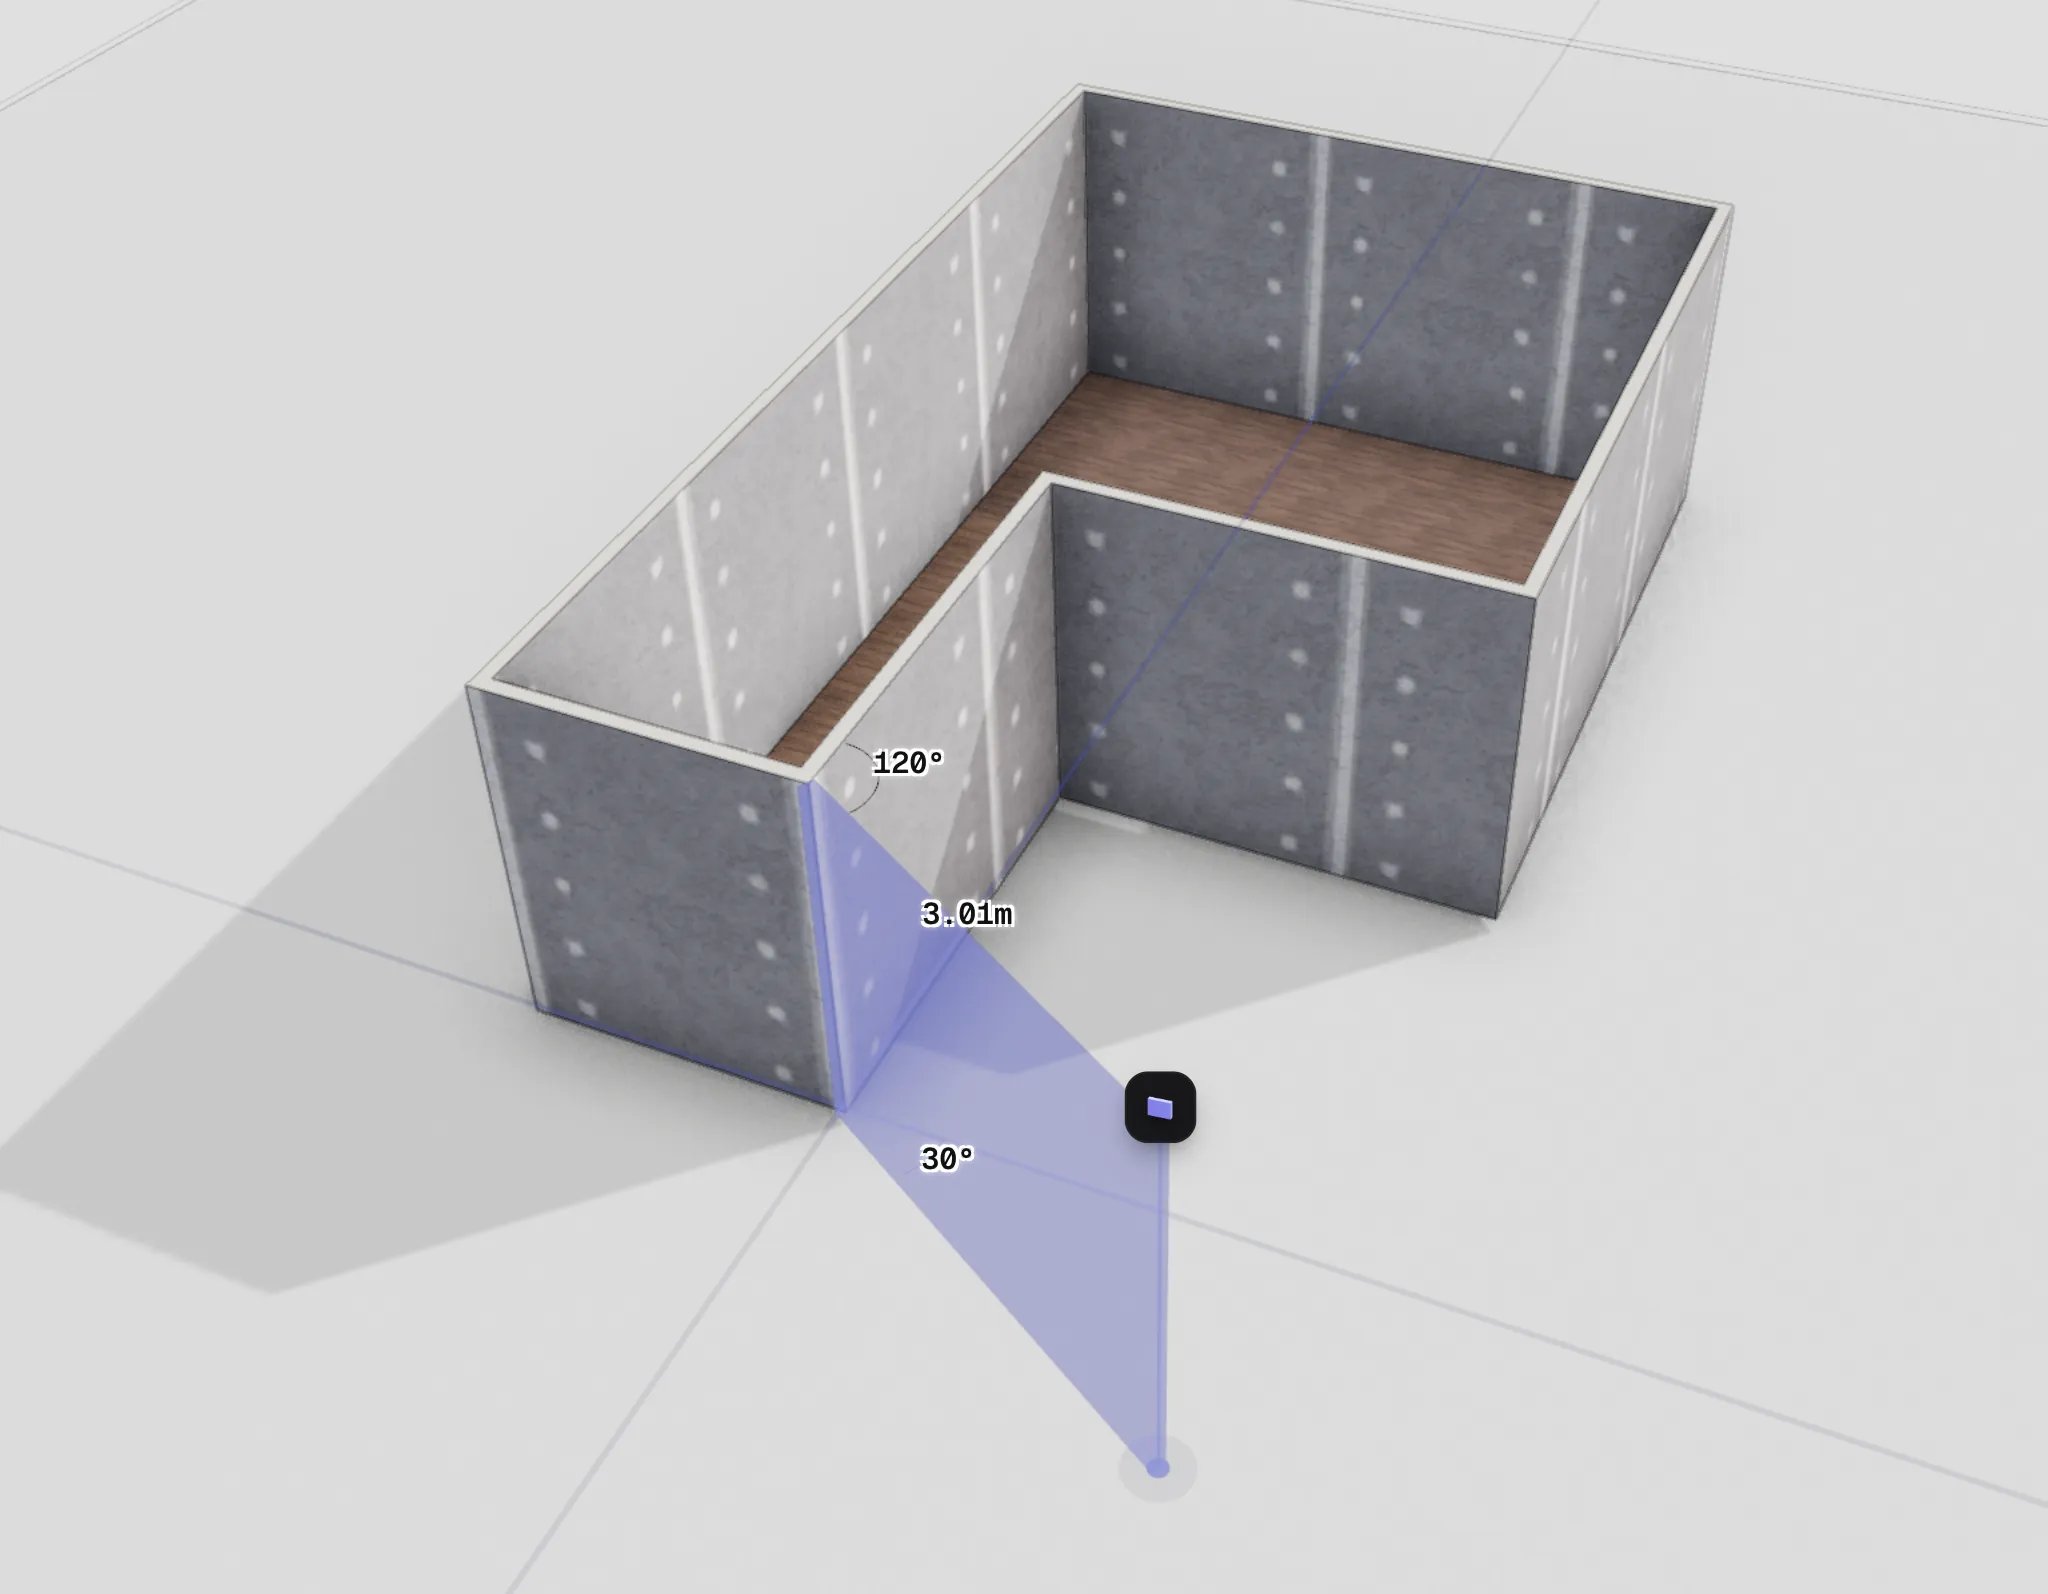
While you draw, a measurement label floats at the segment's midpoint showing its
live length — in meters, or feet and inches if your scene uses imperial units.
Where the draft meets a connected wall, angle arcs and degree labels appear so you
can see the corner you're about to commit.
There's no typed length input during drawing — for an exact figure, place the wall
and set its **Length** in the properties panel afterwards.
## Snapping and alignment
Snapping is an always-visible mode, not a hidden modifier. While the wall tool is
active, the helper panel shows a snapping chip — tap `Shift` (or click the chip)
to cycle through the modes:
* **Grid** — the default. Points snap to the grid lattice. Tap `Ctrl` to cycle the
grid step through 0.5 m, 0.25 m, 0.1 m, and 0.05 m.
* **Lines** — magnetic snapping to existing walls: endpoints, midpoints,
intersections, and wall edges, plus alignment guides to nearby geometry. A
beacon marks the point you're locked onto.
* **Angles** — locks the segment's direction to 15° increments.
* **Off** — nothing snaps; the raw cursor position is used.
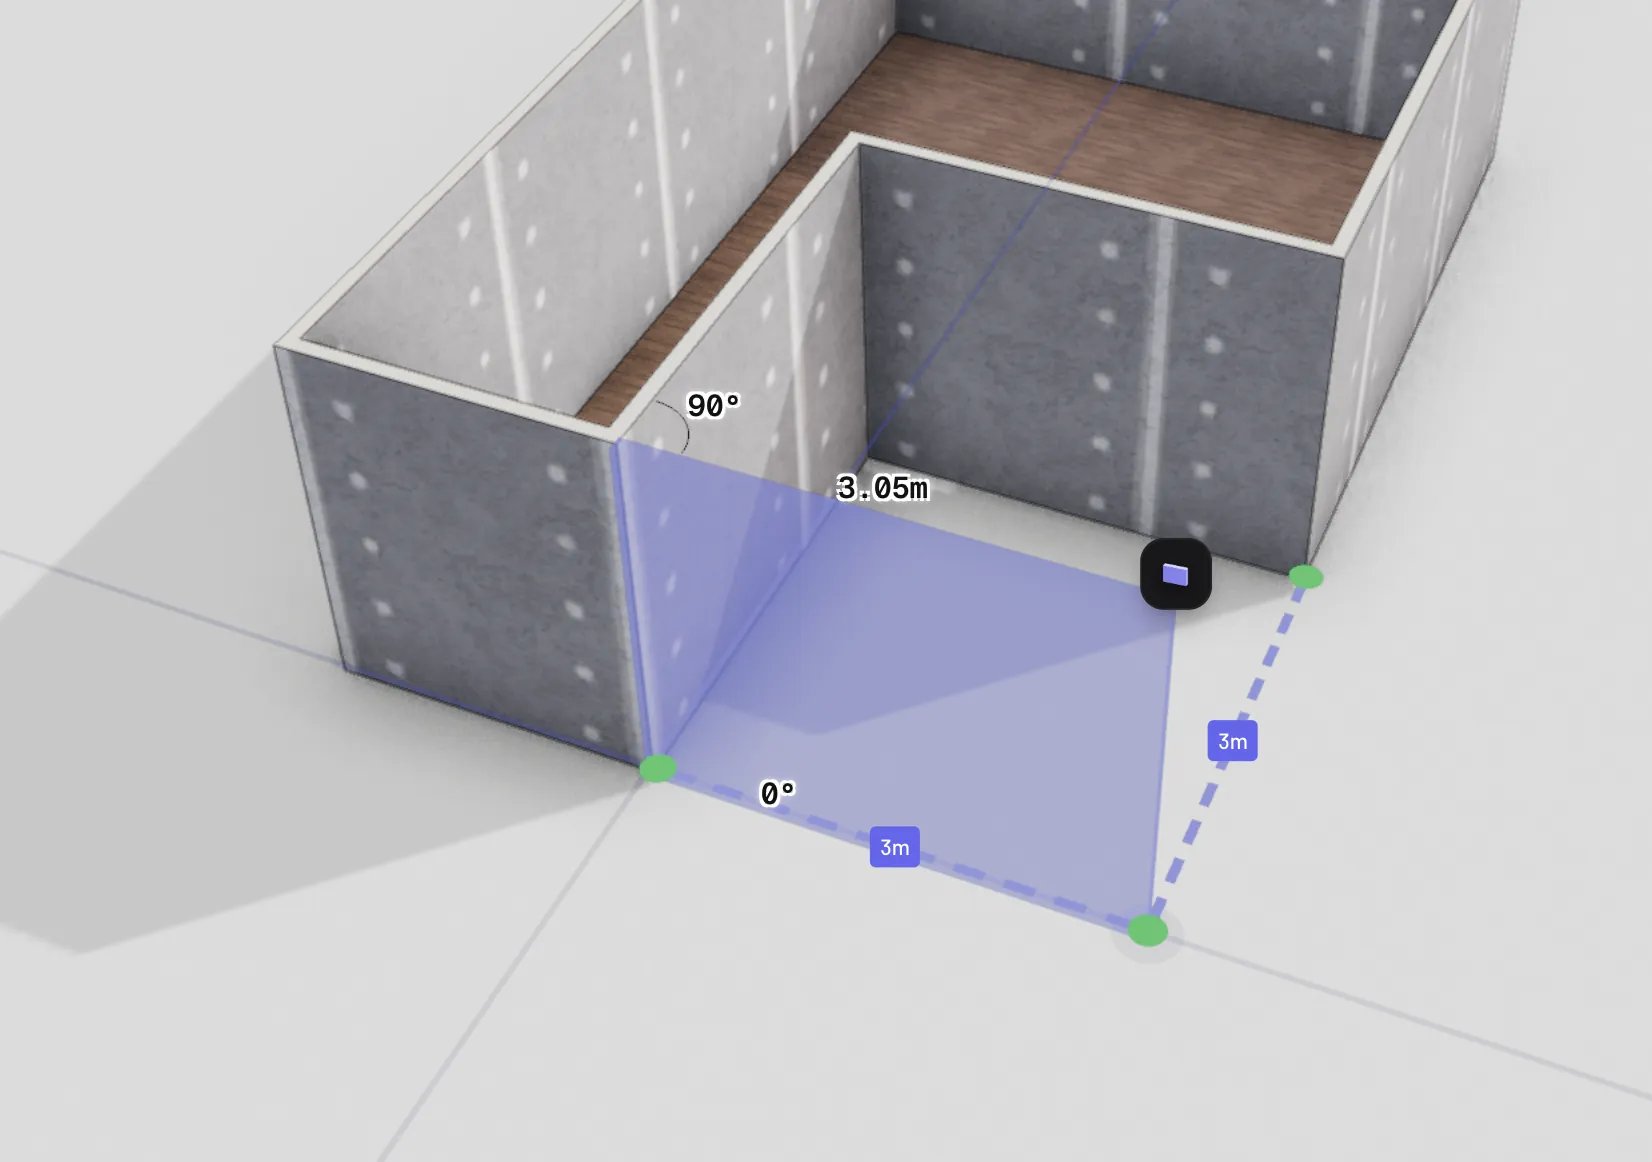
Ending a segment on the body of an existing wall splits that wall at the junction —
any doors or windows on it stay in place on the correct piece.
## Edit a wall
Select a wall in the 3D view or the floor plan to edit it. Both views offer the
same edits:
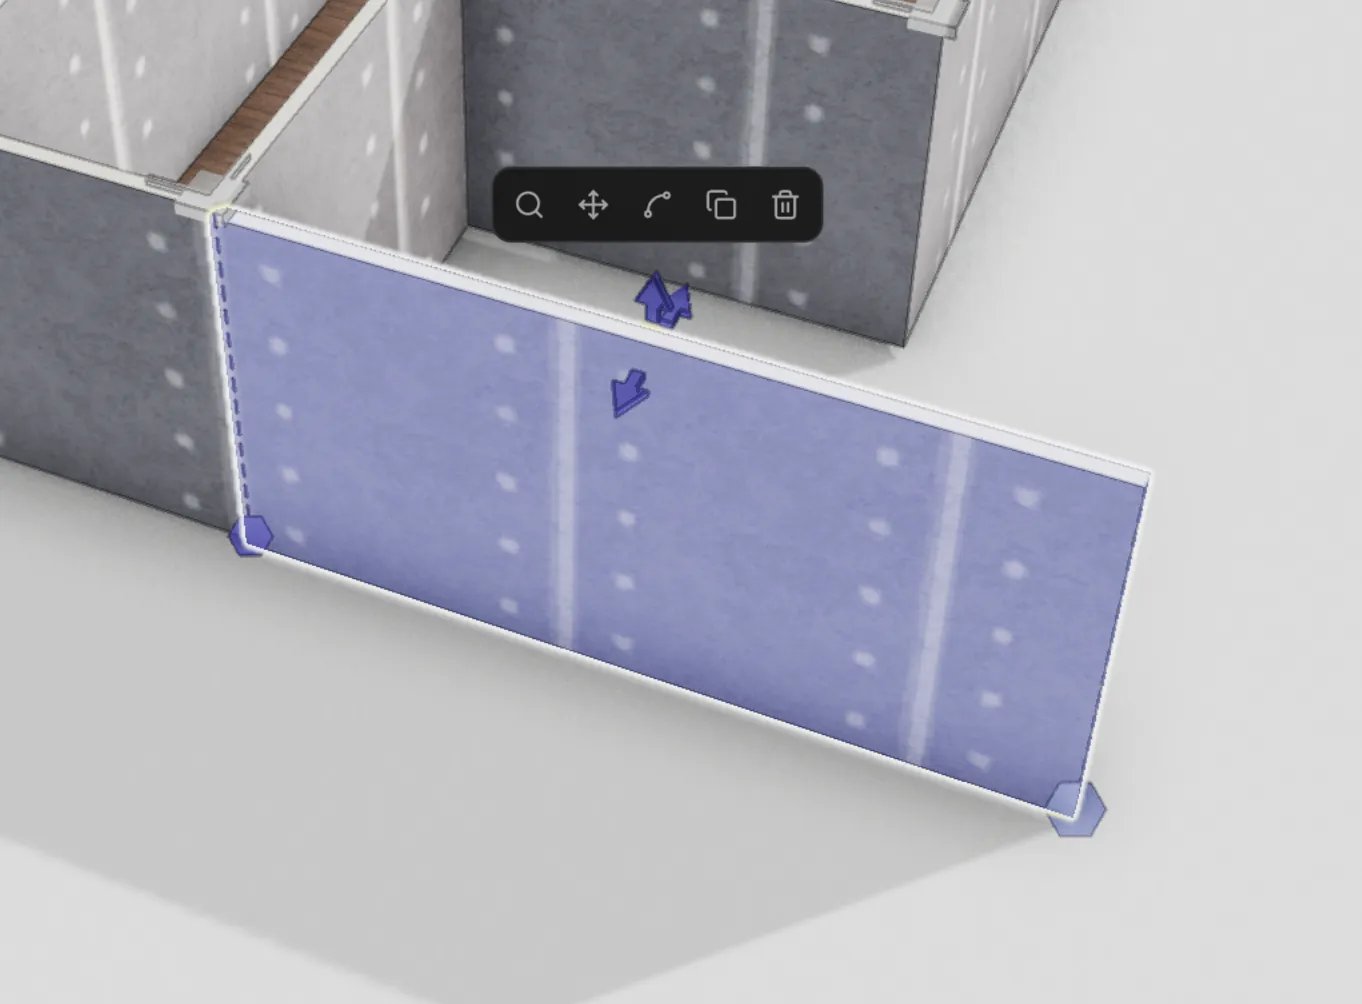
* **Drag an endpoint** to reshape the segment. Walls that share the corner follow
along, keeping the joint intact — hold `Alt` while dragging to detach and move
only the wall you grabbed.
* **Drag the side arrows** to slide the whole wall perpendicular to its direction,
and the top arrow to change its height directly in the scene.
* **Use the properties panel** for exact values. The Dimensions section has
**Length** (0.1–20 m), **Height** (0.1–6 m), **Thickness** (0.05–1 m), and
**Curve** sliders. New walls default to 2.5 m high and 0.1 m thick.
The **Curve** control bends the wall into an arc. It's only available while the
wall hosts no doors, windows, or wall-mounted items — openings need a flat wall.
Doors and windows are attached to their wall, so they move with it when you drag
or reshape it.
## Delete a wall
* Select the wall and press `Delete` or `Backspace`.
* Or switch to delete mode with `X` and click walls to remove them.
* Or use the **Delete** button in the wall's action menu.
Deleting a wall also removes the doors and windows placed in it. If the wall was
part of a closed room, the auto-generated floor and ceiling update to match.
## Watch it in action
The floor plan and 3D views stay in sync while you draw — this tutorial adds a whole
room both ways.
 The helper panel on the right shows a continuation chip — press `C` (or click it)
to switch between the two drawing styles:
* **Room (auto-close)** — the default. Segments keep chaining, and the draft
finishes automatically when you loop back to your starting corner or seal a
room against existing walls.
* **Single wall** — one segment per gesture; drawing stops after the second click.
Double-click to end a chain early, and press `Esc` to cancel the segment you're
drawing. Wall drawing works the same way in the 3D view and the 2D floor plan —
use whichever you prefer.
## Lengths and angles
While you draw, a measurement label floats at the segment's midpoint showing its
live length — in meters, or feet and inches if your scene uses imperial units.
Where the draft meets a connected wall, angle arcs and degree labels appear so you
can see the corner you're about to commit.
The helper panel on the right shows a continuation chip — press `C` (or click it)
to switch between the two drawing styles:
* **Room (auto-close)** — the default. Segments keep chaining, and the draft
finishes automatically when you loop back to your starting corner or seal a
room against existing walls.
* **Single wall** — one segment per gesture; drawing stops after the second click.
Double-click to end a chain early, and press `Esc` to cancel the segment you're
drawing. Wall drawing works the same way in the 3D view and the 2D floor plan —
use whichever you prefer.
## Lengths and angles
While you draw, a measurement label floats at the segment's midpoint showing its
live length — in meters, or feet and inches if your scene uses imperial units.
Where the draft meets a connected wall, angle arcs and degree labels appear so you
can see the corner you're about to commit.
 There's no typed length input during drawing — for an exact figure, place the wall
and set its **Length** in the properties panel afterwards.
## Snapping and alignment
Snapping is an always-visible mode, not a hidden modifier. While the wall tool is
active, the helper panel shows a snapping chip — tap `Shift` (or click the chip)
to cycle through the modes:
* **Grid** — the default. Points snap to the grid lattice. Tap `Ctrl` to cycle the
grid step through 0.5 m, 0.25 m, 0.1 m, and 0.05 m.
* **Lines** — magnetic snapping to existing walls: endpoints, midpoints,
intersections, and wall edges, plus alignment guides to nearby geometry. A
beacon marks the point you're locked onto.
* **Angles** — locks the segment's direction to 15° increments.
* **Off** — nothing snaps; the raw cursor position is used.
There's no typed length input during drawing — for an exact figure, place the wall
and set its **Length** in the properties panel afterwards.
## Snapping and alignment
Snapping is an always-visible mode, not a hidden modifier. While the wall tool is
active, the helper panel shows a snapping chip — tap `Shift` (or click the chip)
to cycle through the modes:
* **Grid** — the default. Points snap to the grid lattice. Tap `Ctrl` to cycle the
grid step through 0.5 m, 0.25 m, 0.1 m, and 0.05 m.
* **Lines** — magnetic snapping to existing walls: endpoints, midpoints,
intersections, and wall edges, plus alignment guides to nearby geometry. A
beacon marks the point you're locked onto.
* **Angles** — locks the segment's direction to 15° increments.
* **Off** — nothing snaps; the raw cursor position is used.
 Ending a segment on the body of an existing wall splits that wall at the junction —
any doors or windows on it stay in place on the correct piece.
## Edit a wall
Select a wall in the 3D view or the floor plan to edit it. Both views offer the
same edits:
* **Drag an endpoint** to reshape the segment. Walls that share the corner follow
along, keeping the joint intact — hold `Alt` while dragging to detach and move
only the wall you grabbed.
* **Drag the side arrows** to slide the whole wall perpendicular to its direction,
and the top arrow to change its height directly in the scene.
* **Use the properties panel** for exact values. The Dimensions section has
**Length** (0.1–20 m), **Height** (0.1–6 m), **Thickness** (0.05–1 m), and
**Curve** sliders. New walls default to 2.5 m high and 0.1 m thick.
Ending a segment on the body of an existing wall splits that wall at the junction —
any doors or windows on it stay in place on the correct piece.
## Edit a wall
Select a wall in the 3D view or the floor plan to edit it. Both views offer the
same edits:
* **Drag an endpoint** to reshape the segment. Walls that share the corner follow
along, keeping the joint intact — hold `Alt` while dragging to detach and move
only the wall you grabbed.
* **Drag the side arrows** to slide the whole wall perpendicular to its direction,
and the top arrow to change its height directly in the scene.
* **Use the properties panel** for exact values. The Dimensions section has
**Length** (0.1–20 m), **Height** (0.1–6 m), **Thickness** (0.05–1 m), and
**Curve** sliders. New walls default to 2.5 m high and 0.1 m thick.
 The **Curve** control bends the wall into an arc. It's only available while the
wall hosts no doors, windows, or wall-mounted items — openings need a flat wall.
Doors and windows are attached to their wall, so they move with it when you drag
or reshape it.
## Delete a wall
* Select the wall and press `Delete` or `Backspace`.
* Or switch to delete mode with `X` and click walls to remove them.
* Or use the **Delete** button in the wall's action menu.
Deleting a wall also removes the doors and windows placed in it. If the wall was
part of a closed room, the auto-generated floor and ceiling update to match.
## Watch it in action
The floor plan and 3D views stay in sync while you draw — this tutorial adds a whole
room both ways.
The **Curve** control bends the wall into an arc. It's only available while the
wall hosts no doors, windows, or wall-mounted items — openings need a flat wall.
Doors and windows are attached to their wall, so they move with it when you drag
or reshape it.
## Delete a wall
* Select the wall and press `Delete` or `Backspace`.
* Or switch to delete mode with `X` and click walls to remove them.
* Or use the **Delete** button in the wall's action menu.
Deleting a wall also removes the doors and windows placed in it. If the wall was
part of a closed room, the auto-generated floor and ceiling update to match.
## Watch it in action
The floor plan and 3D views stay in sync while you draw — this tutorial adds a whole
room both ways.