> ## Documentation Index
> Fetch the complete documentation index at: https://editor.pascal.app/docs/llms.txt
> Use this file to discover all available pages before exploring further.
# Guide images
> Put a floor plan, sketch, or site drawing under the grid as a scaled reference, and build right over it.
A guide image is a reference picture that sits flat under the grid — a floor plan,
a hand sketch, a survey drawing. Scale it to its real dimensions and it does the
measuring for you: trace walls over it instead of guessing lengths.
Guide images belong to the level they're added on, so a multi-storey plan can have
one guide per floor. They're part of the **References** control in the bottom toolbar,
alongside [scans from Pascal Capture](/capture/overview).
## Add a guide image
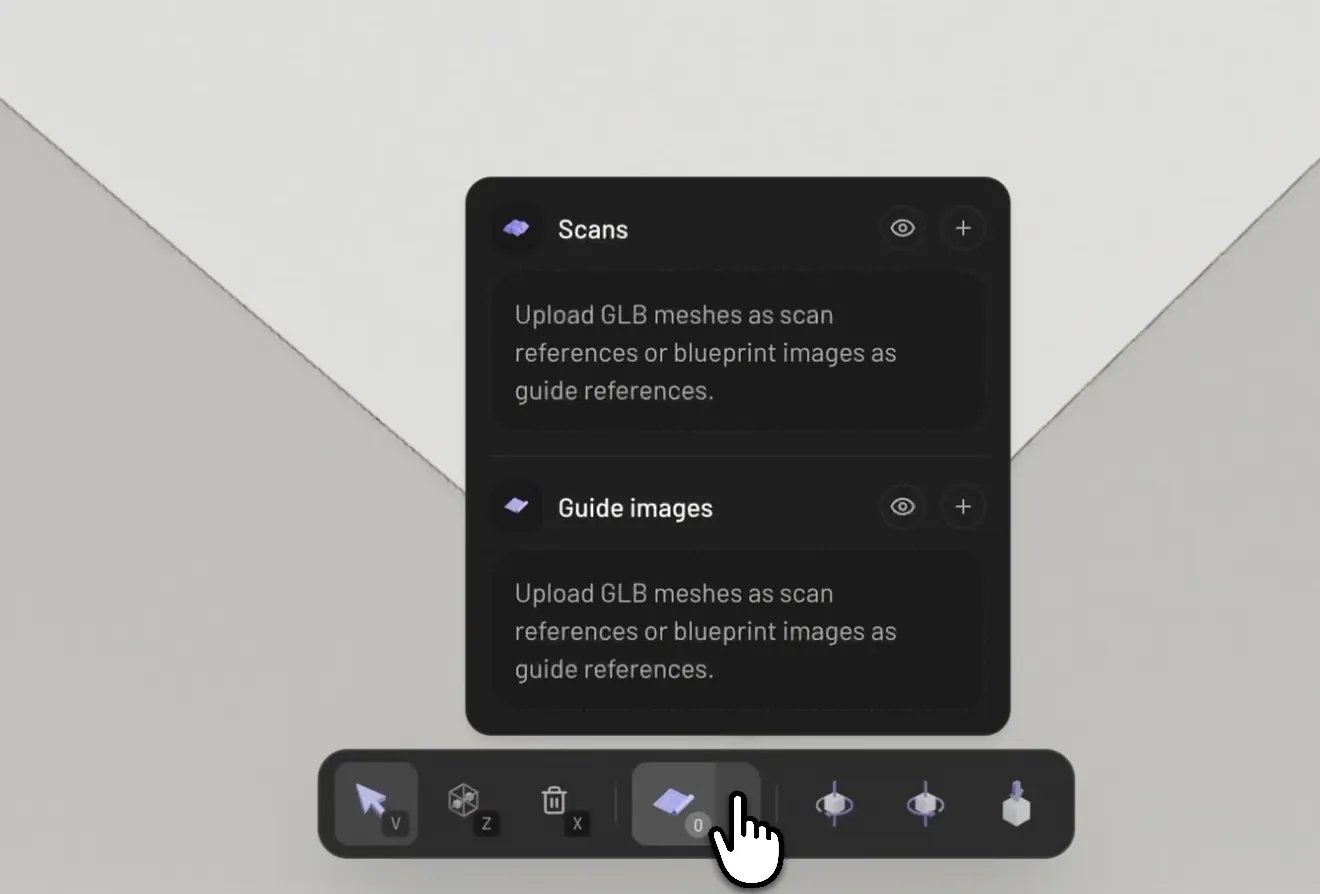
In the bottom toolbar, expand the **References** control and open **Guide images**,
then click the upload button and pick a JPEG, PNG, WebP, or GIF. A photo of a paper
plan works fine. Uploaded guides also appear in the **Files** tab of the sidebar, and
clicking a guide selects it and opens its panel on the right.
## Position, rotate, and resize
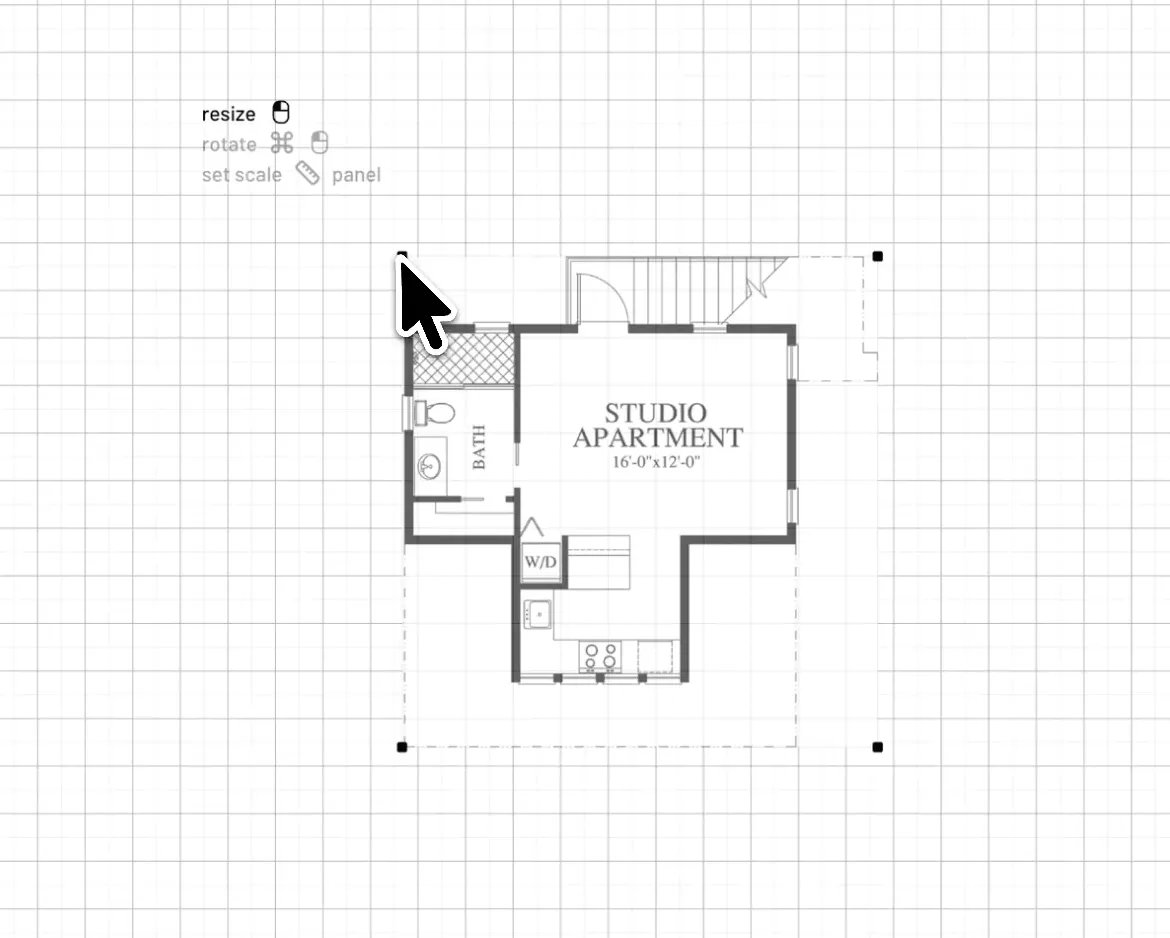
The **2D** view is the easiest place to line a guide up — click the compass to align
the view to north. With the guide selected:
* **Move** — click and drag it.
* **Rotate** — press `R` or `T` to rotate in steps, or grab a corner handle to rotate
freely.
* **Resize** — drag the corner handles.
The panel on the right also has precise **Position** and **Rotation** fields, and a
**Replace** action that swaps the image while keeping its placement.
## Set the scale
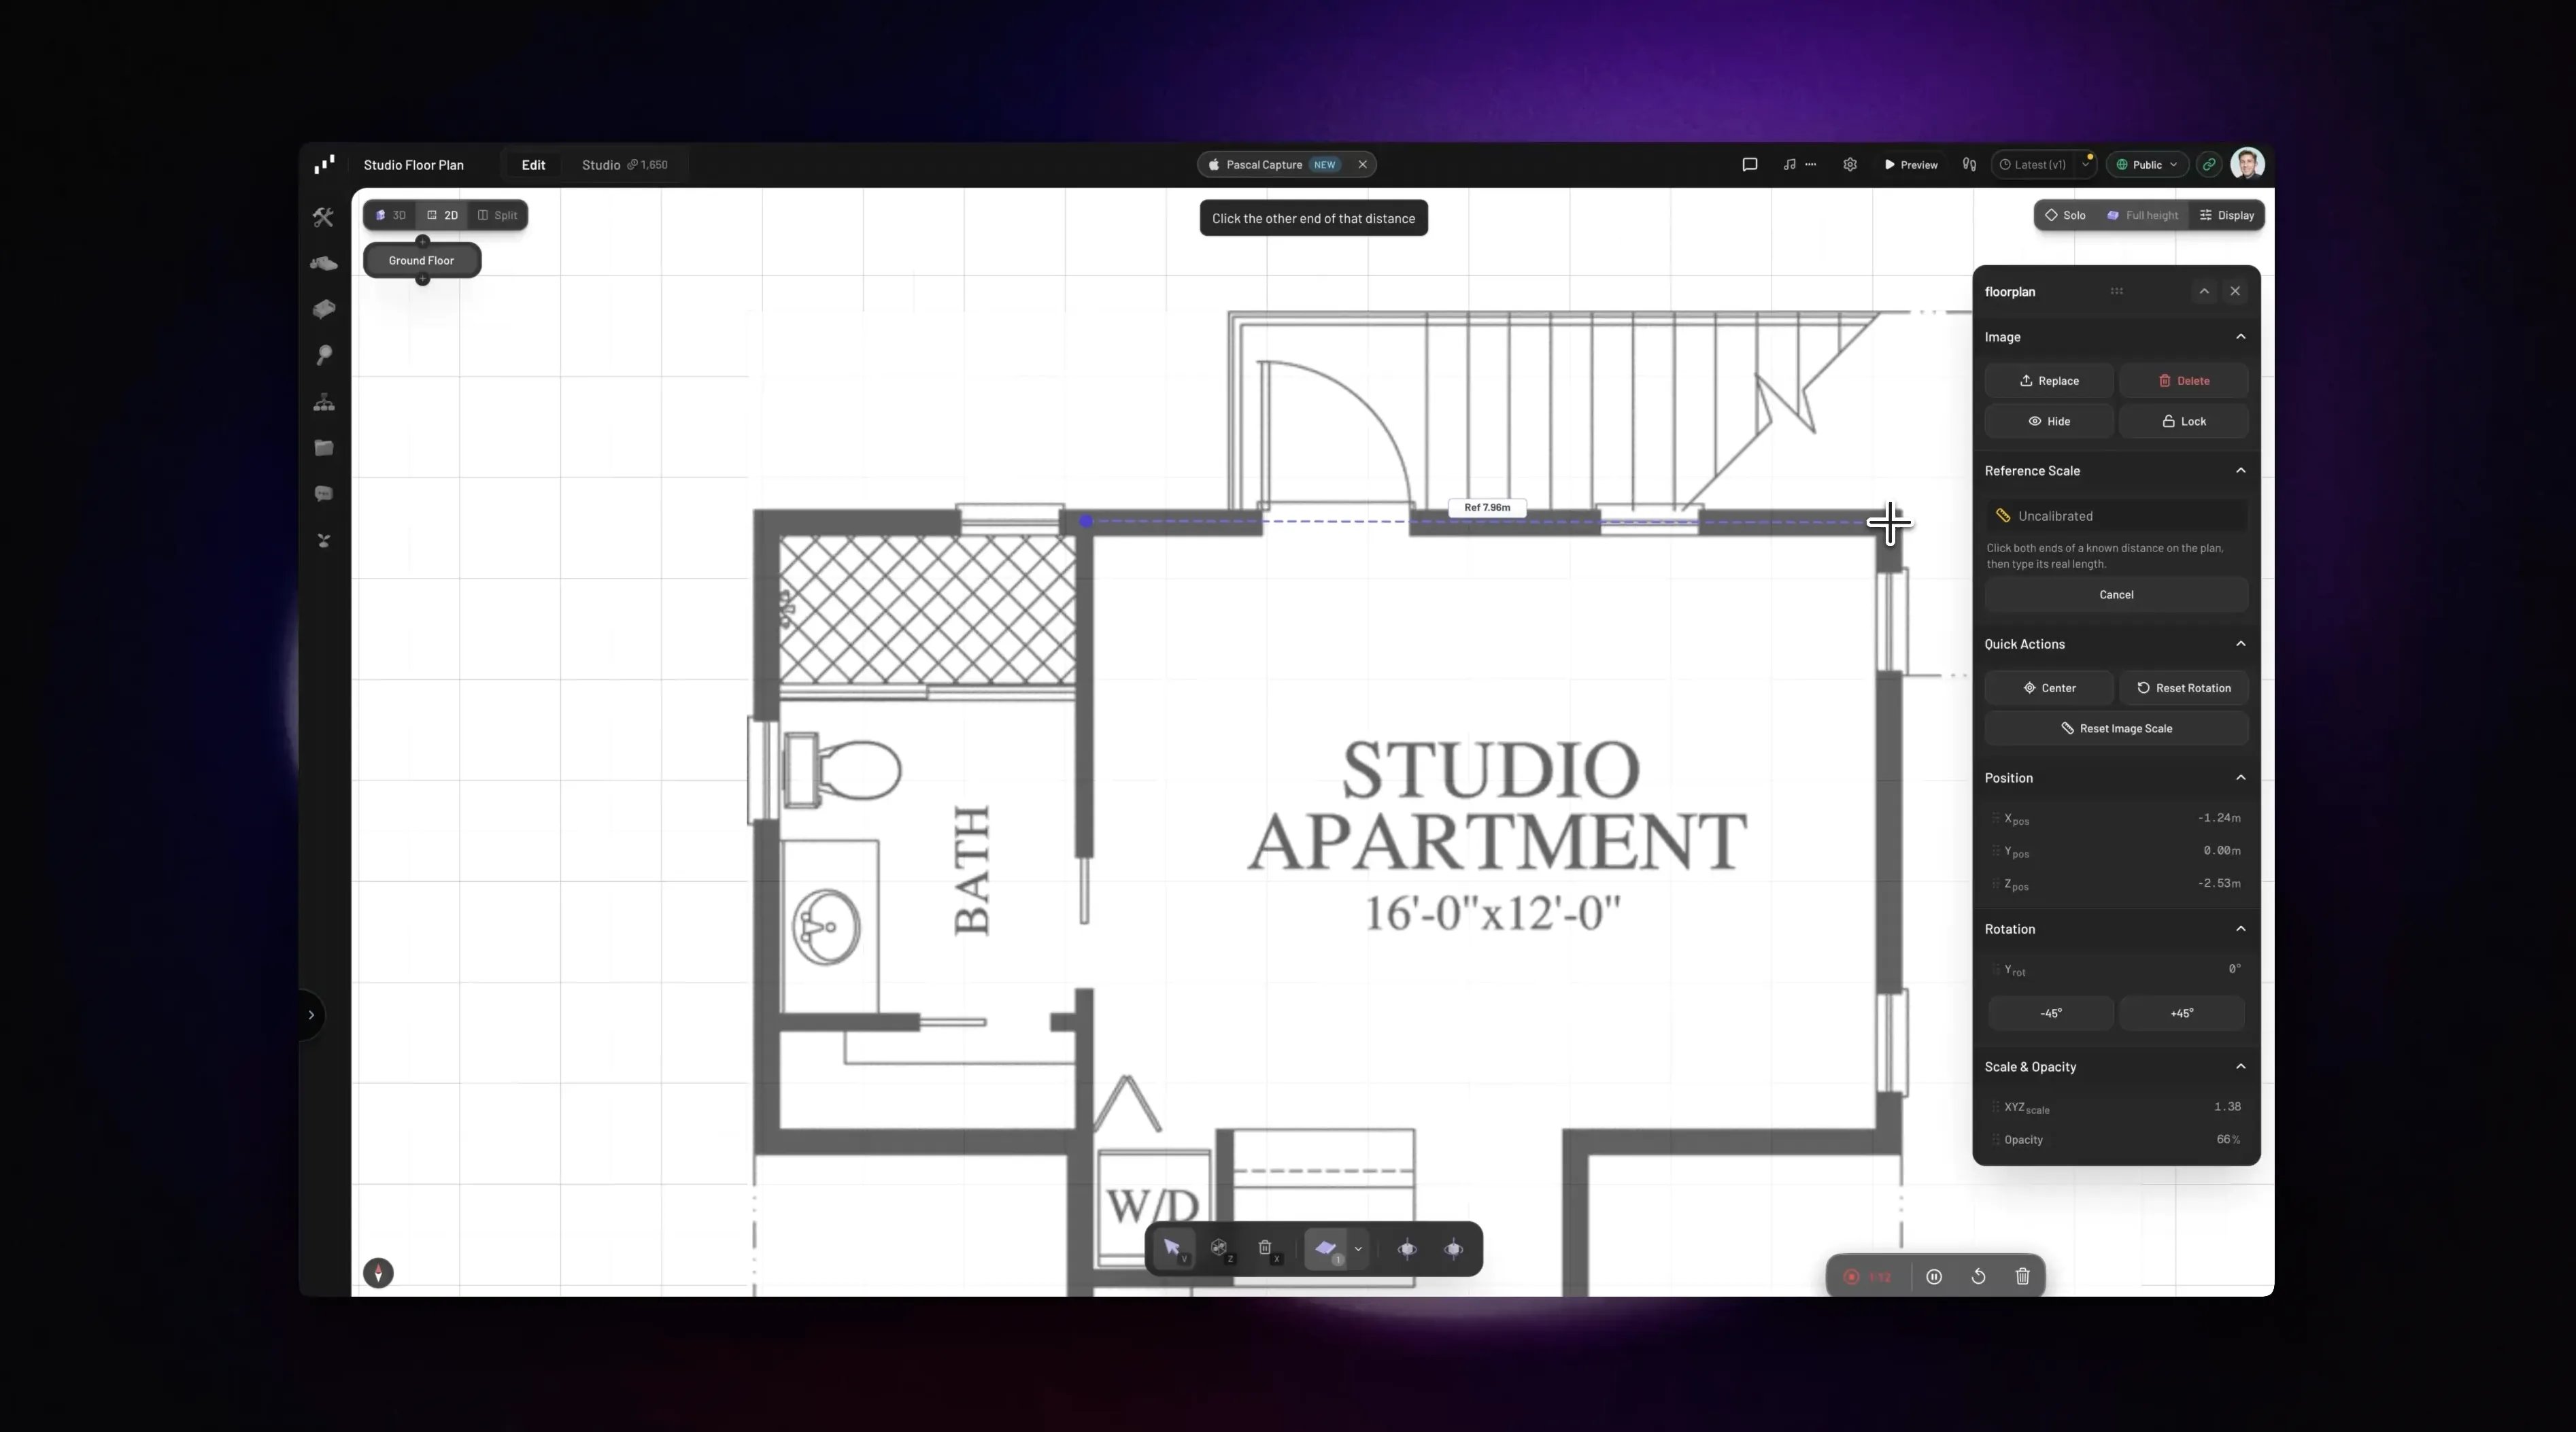
Handles get the guide roughly in place; **Set Scale** makes it exact. In the guide's
panel, click **Set Scale** and click both ends of a known distance on the plan — the
legend if it has one, or any dimension you know, like a room width. Type its real
length in whatever unit you prefer and the whole image snaps to true size.
Calibrating locks the guide automatically so it can't drift while you build.
**Edit Scale** re-runs the calibration, **Hide Scale** tucks the scale line away, and
**Clear Scale** removes the calibration and unlocks the guide again.
## Opacity, lock, and visibility
* **Opacity** — fade the image so it reads clearly under the grid without competing
with your walls.
* **Lock** / **Unlock** — a locked guide ignores clicks, drags, and keyboard nudges,
so you can't grab it by accident while tracing. Unlock it to reposition.
* **Hide** / **Show** — per guide, without losing its placement. The **References**
button in the bottom toolbar toggles all references on the level at once.
* **Delete** — from the guide's row in the **Guide images** list.
## Build over it
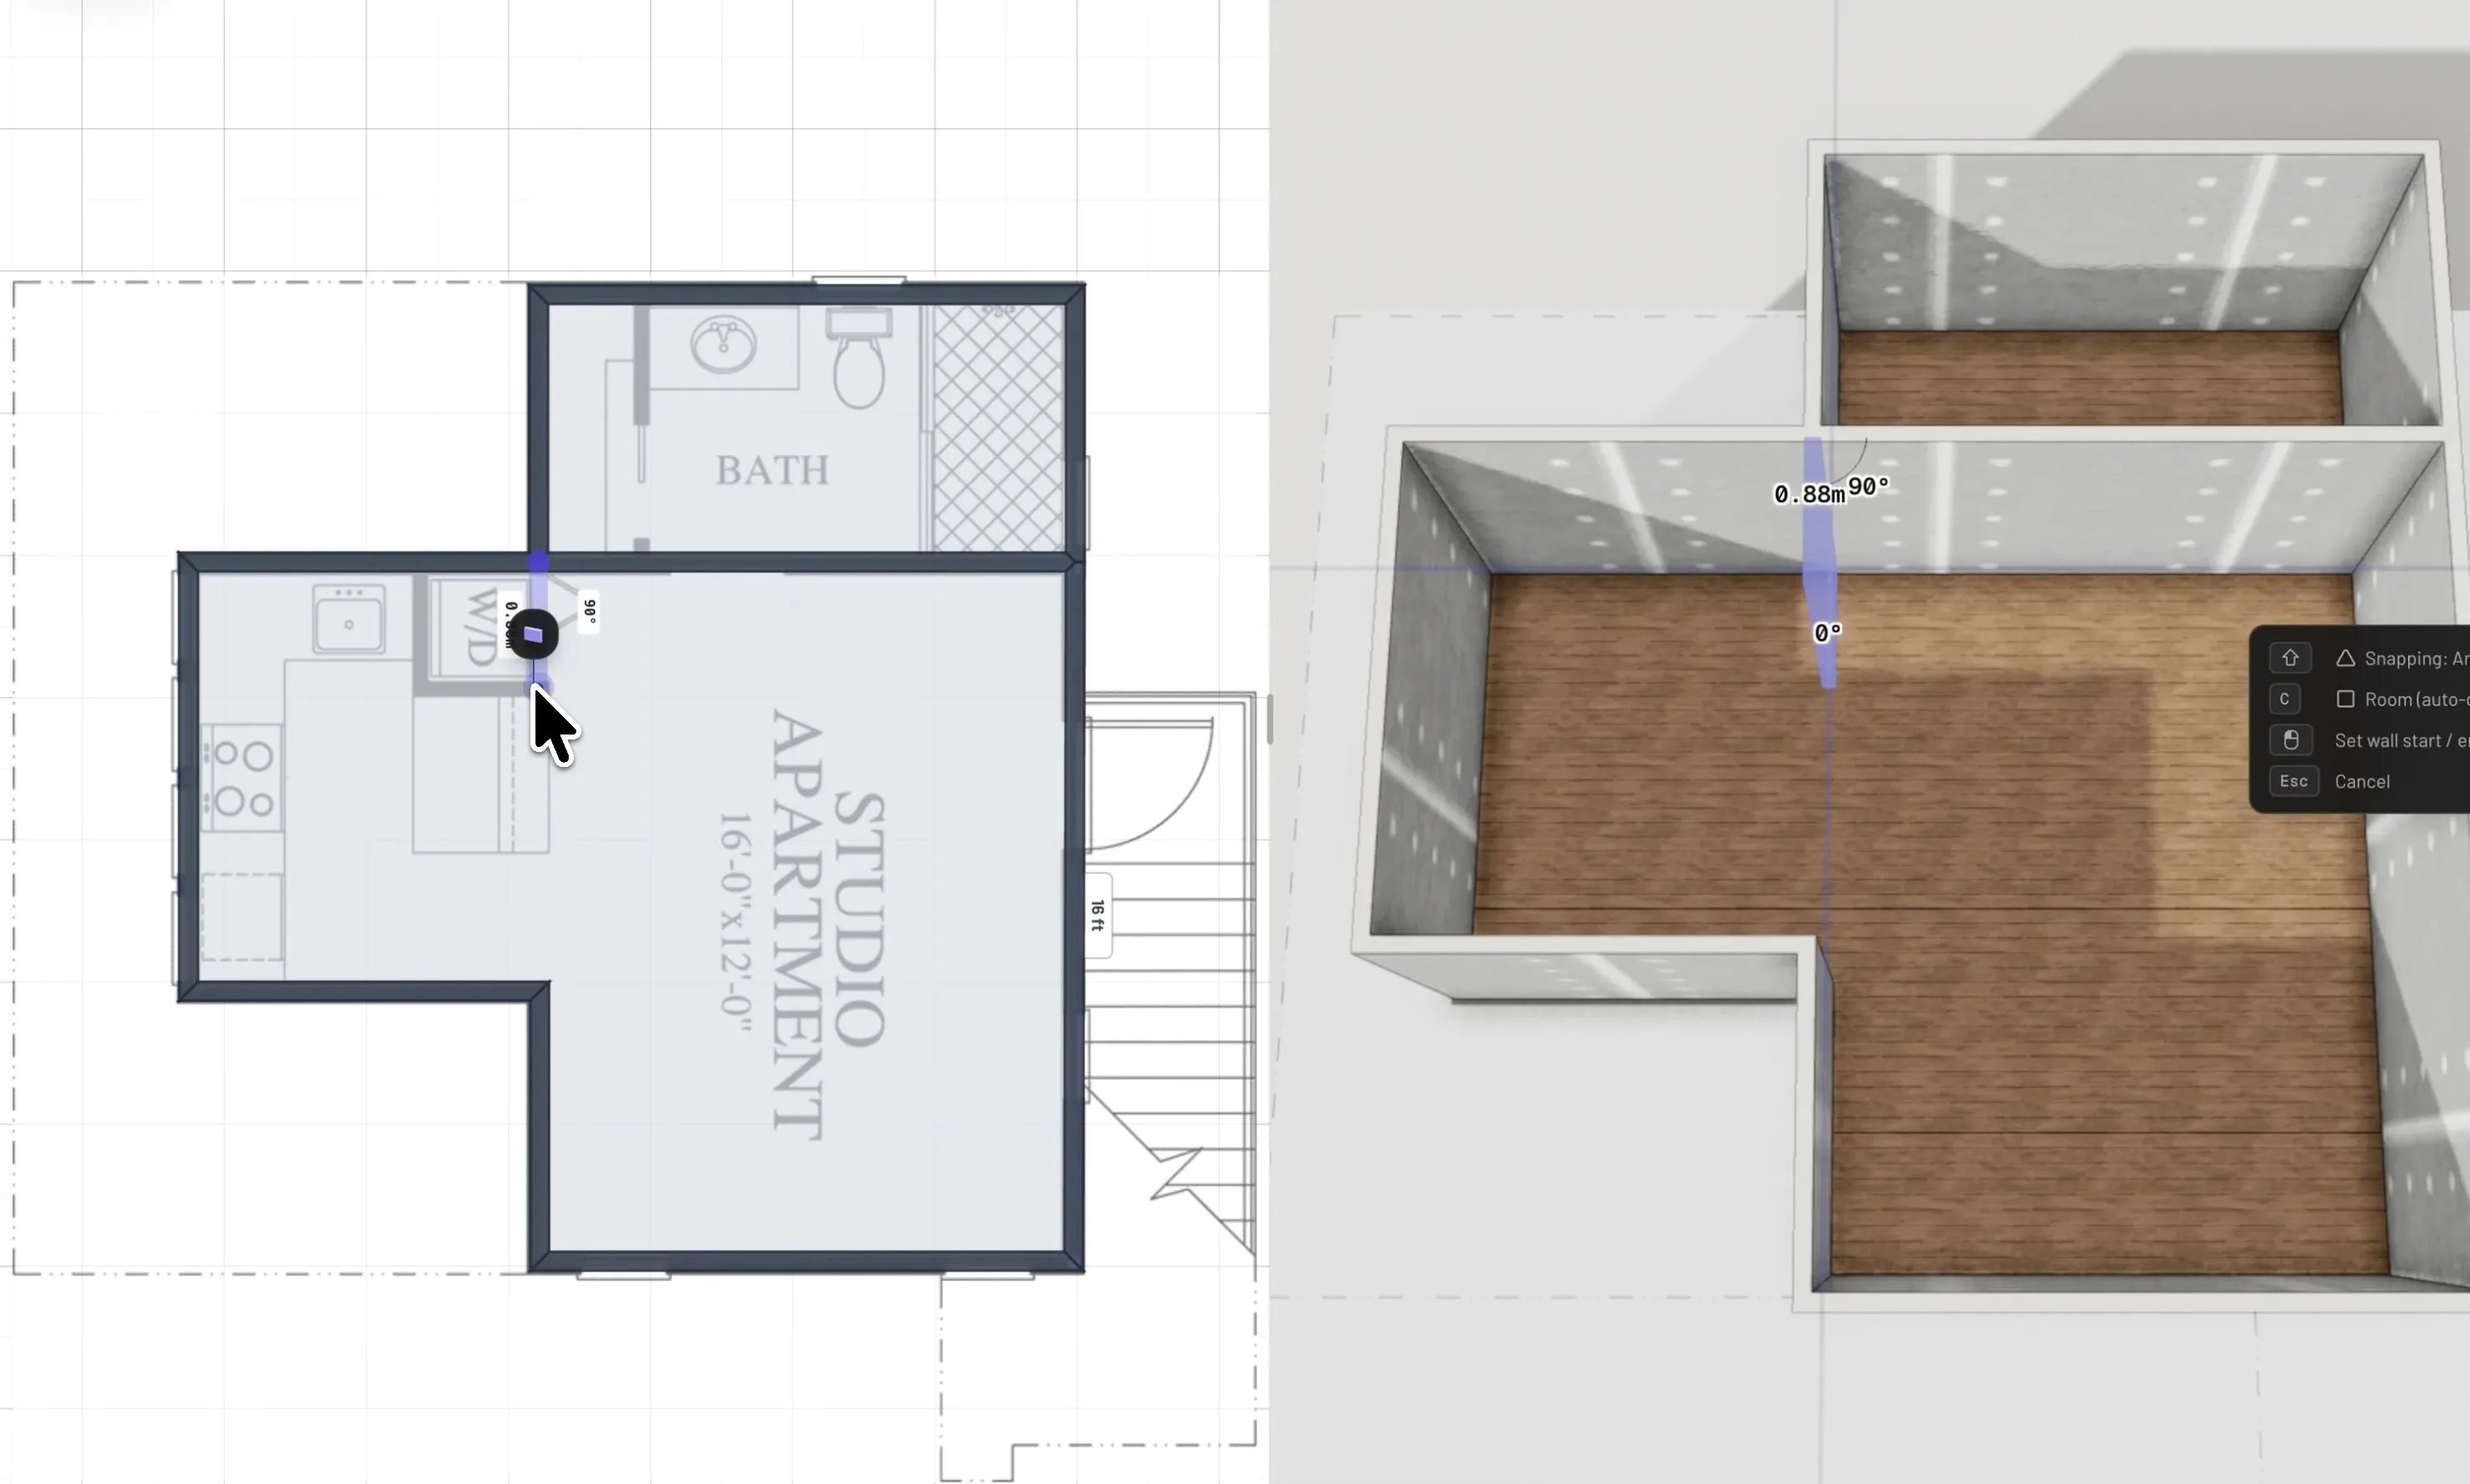
With the guide scaled and locked, trace directly on top of it: arm the
[Wall tool](/building/walls) (`B`) and follow the plan's walls in 2D — tap `Shift`
to cycle snapping modes; **Angles** keeps corners square. When walls enclose a space,
Pascal creates the room automatically.
For [doors and windows](/building/doors-and-windows), **Split** view helps: place the
opening in 3D to get the height right, then fine-tune its position against the plan
in 2D. When the model is up, hide or delete the guide.
## Watch it in action
A full build over a real plan — from a blank scene to a furnished studio apartment.
 ## Add a guide image
In the bottom toolbar, expand the **References** control and open **Guide images**,
then click the upload button and pick a JPEG, PNG, WebP, or GIF. A photo of a paper
plan works fine. Uploaded guides also appear in the **Files** tab of the sidebar, and
clicking a guide selects it and opens its panel on the right.
## Add a guide image
In the bottom toolbar, expand the **References** control and open **Guide images**,
then click the upload button and pick a JPEG, PNG, WebP, or GIF. A photo of a paper
plan works fine. Uploaded guides also appear in the **Files** tab of the sidebar, and
clicking a guide selects it and opens its panel on the right.
 ## Position, rotate, and resize
The **2D** view is the easiest place to line a guide up — click the compass to align
the view to north. With the guide selected:
* **Move** — click and drag it.
* **Rotate** — press `R` or `T` to rotate in steps, or grab a corner handle to rotate
freely.
* **Resize** — drag the corner handles.
The panel on the right also has precise **Position** and **Rotation** fields, and a
**Replace** action that swaps the image while keeping its placement.
## Position, rotate, and resize
The **2D** view is the easiest place to line a guide up — click the compass to align
the view to north. With the guide selected:
* **Move** — click and drag it.
* **Rotate** — press `R` or `T` to rotate in steps, or grab a corner handle to rotate
freely.
* **Resize** — drag the corner handles.
The panel on the right also has precise **Position** and **Rotation** fields, and a
**Replace** action that swaps the image while keeping its placement.
 ## Set the scale
Handles get the guide roughly in place; **Set Scale** makes it exact. In the guide's
panel, click **Set Scale** and click both ends of a known distance on the plan — the
legend if it has one, or any dimension you know, like a room width. Type its real
length in whatever unit you prefer and the whole image snaps to true size.
Calibrating locks the guide automatically so it can't drift while you build.
**Edit Scale** re-runs the calibration, **Hide Scale** tucks the scale line away, and
**Clear Scale** removes the calibration and unlocks the guide again.
## Set the scale
Handles get the guide roughly in place; **Set Scale** makes it exact. In the guide's
panel, click **Set Scale** and click both ends of a known distance on the plan — the
legend if it has one, or any dimension you know, like a room width. Type its real
length in whatever unit you prefer and the whole image snaps to true size.
Calibrating locks the guide automatically so it can't drift while you build.
**Edit Scale** re-runs the calibration, **Hide Scale** tucks the scale line away, and
**Clear Scale** removes the calibration and unlocks the guide again.
 ## Opacity, lock, and visibility
* **Opacity** — fade the image so it reads clearly under the grid without competing
with your walls.
* **Lock** / **Unlock** — a locked guide ignores clicks, drags, and keyboard nudges,
so you can't grab it by accident while tracing. Unlock it to reposition.
* **Hide** / **Show** — per guide, without losing its placement. The **References**
button in the bottom toolbar toggles all references on the level at once.
* **Delete** — from the guide's row in the **Guide images** list.
## Build over it
With the guide scaled and locked, trace directly on top of it: arm the
[Wall tool](/building/walls) (`B`) and follow the plan's walls in 2D — tap `Shift`
to cycle snapping modes; **Angles** keeps corners square. When walls enclose a space,
Pascal creates the room automatically.
For [doors and windows](/building/doors-and-windows), **Split** view helps: place the
opening in 3D to get the height right, then fine-tune its position against the plan
in 2D. When the model is up, hide or delete the guide.
## Opacity, lock, and visibility
* **Opacity** — fade the image so it reads clearly under the grid without competing
with your walls.
* **Lock** / **Unlock** — a locked guide ignores clicks, drags, and keyboard nudges,
so you can't grab it by accident while tracing. Unlock it to reposition.
* **Hide** / **Show** — per guide, without losing its placement. The **References**
button in the bottom toolbar toggles all references on the level at once.
* **Delete** — from the guide's row in the **Guide images** list.
## Build over it
With the guide scaled and locked, trace directly on top of it: arm the
[Wall tool](/building/walls) (`B`) and follow the plan's walls in 2D — tap `Shift`
to cycle snapping modes; **Angles** keeps corners square. When walls enclose a space,
Pascal creates the room automatically.
For [doors and windows](/building/doors-and-windows), **Split** view helps: place the
opening in 3D to get the height right, then fine-tune its position against the plan
in 2D. When the model is up, hide or delete the guide.
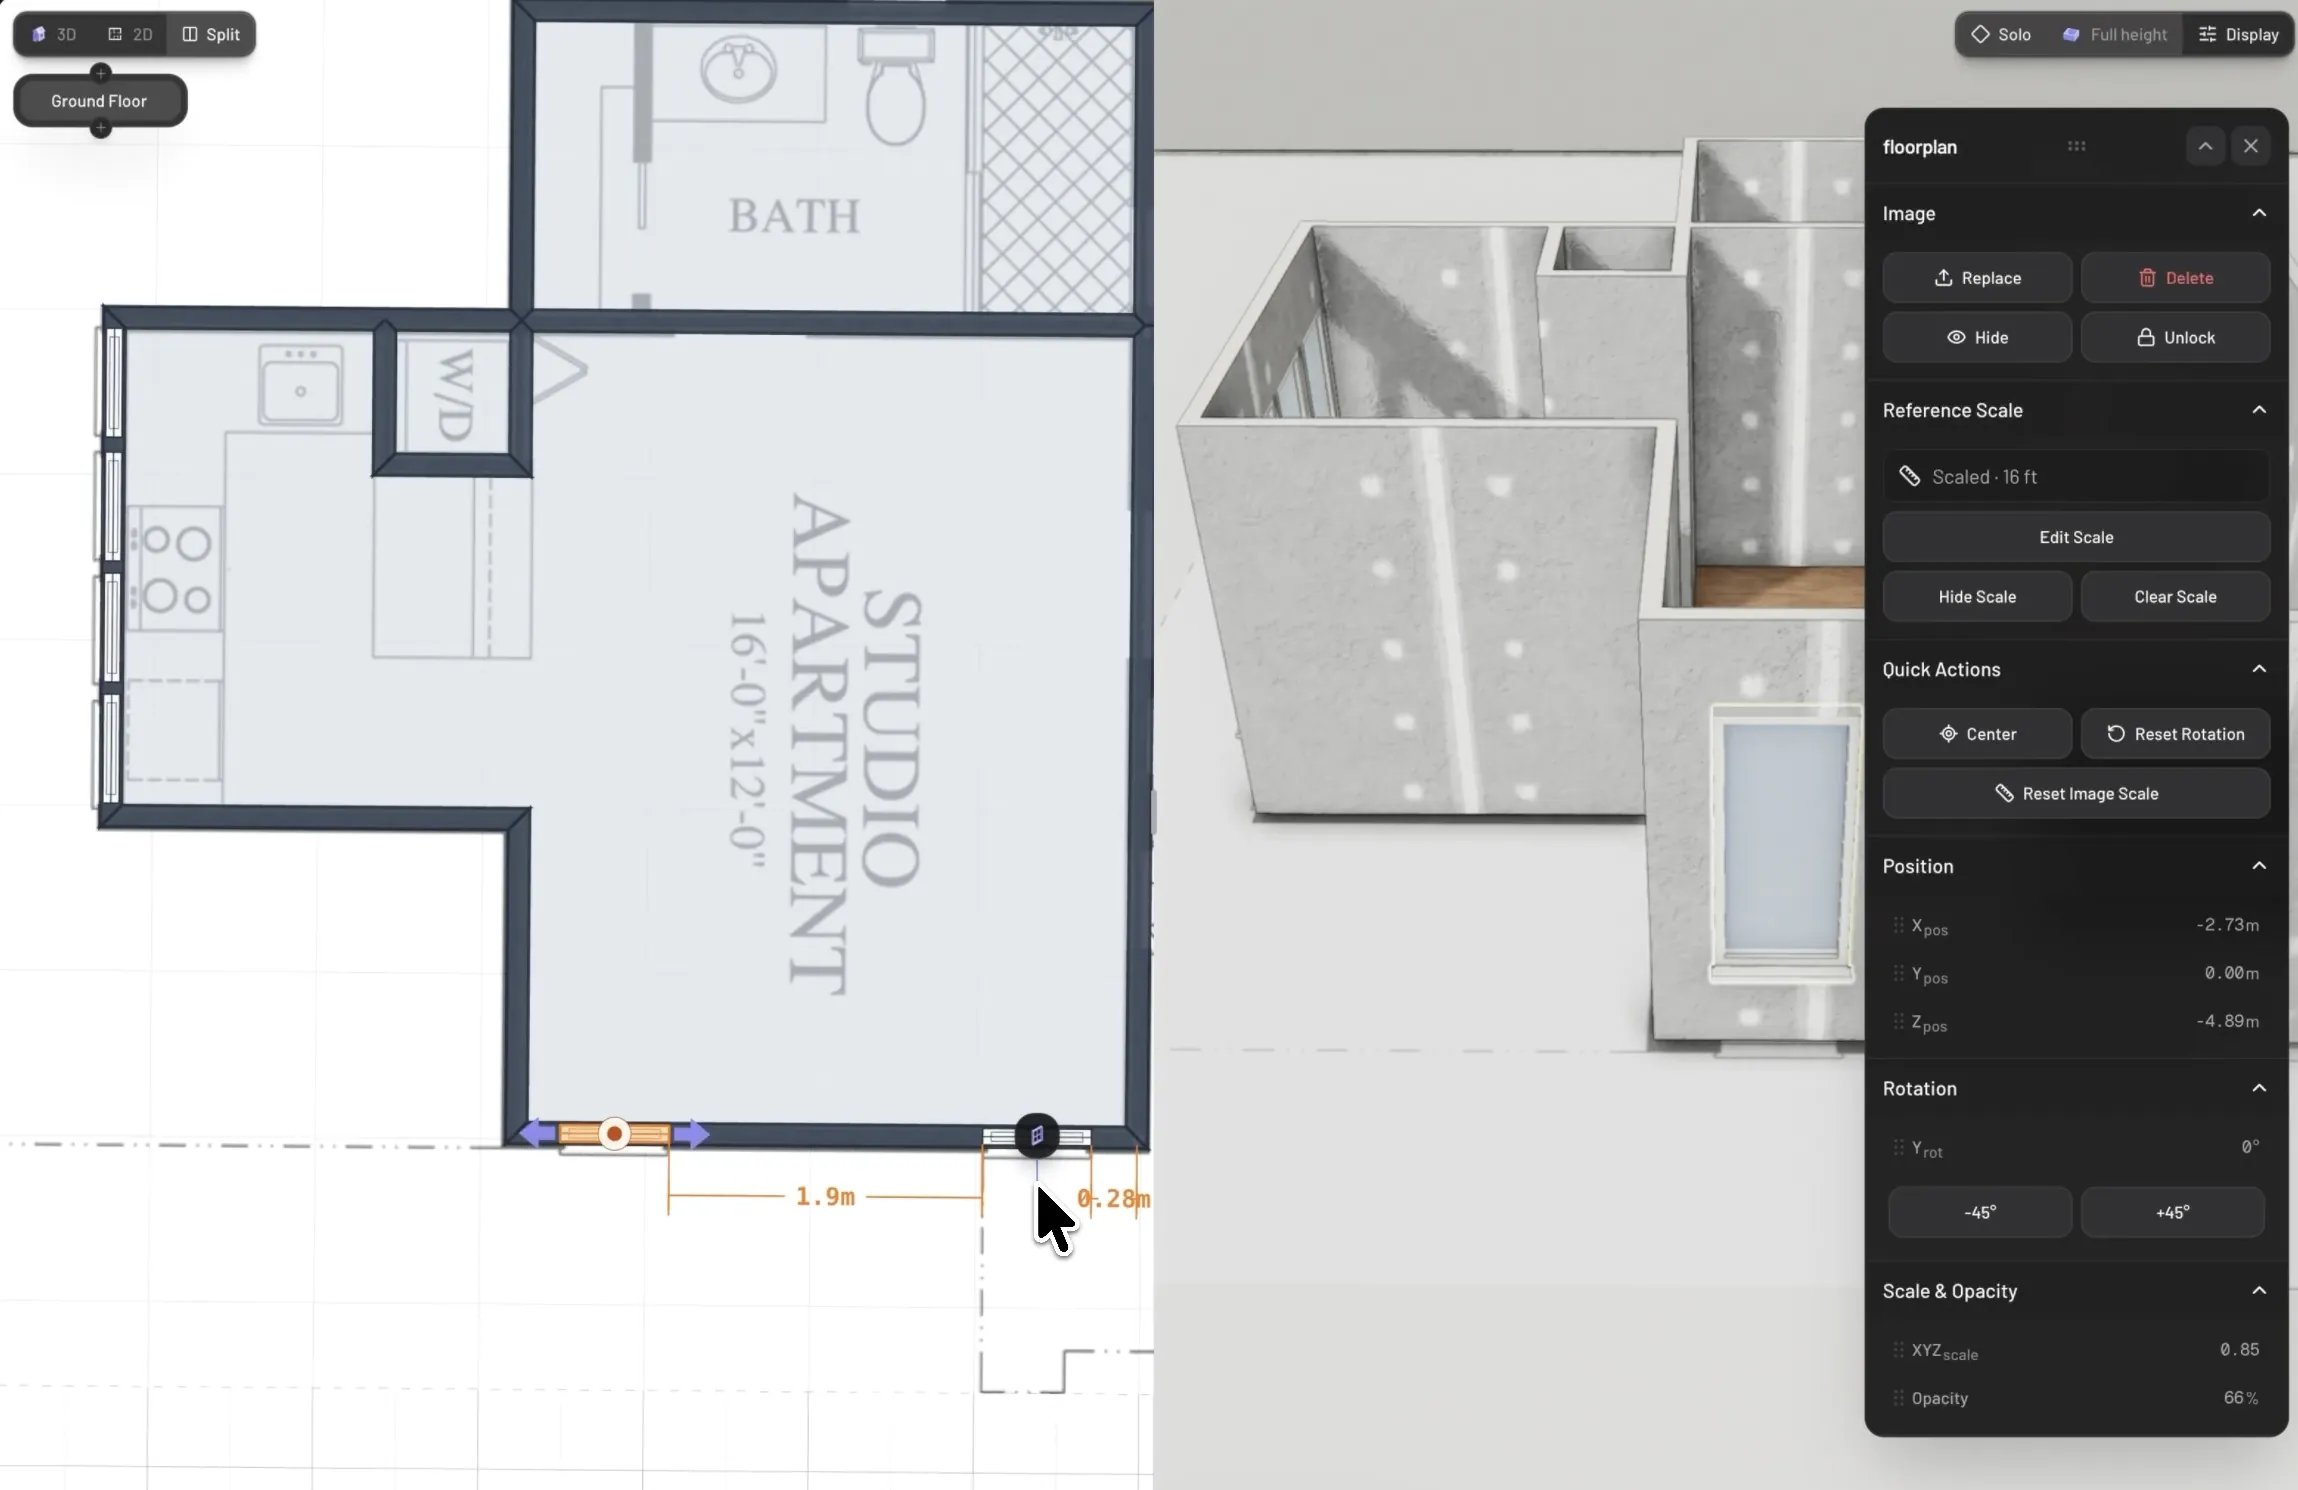 ## Watch it in action
A full build over a real plan — from a blank scene to a furnished studio apartment.
## Watch it in action
A full build over a real plan — from a blank scene to a furnished studio apartment.